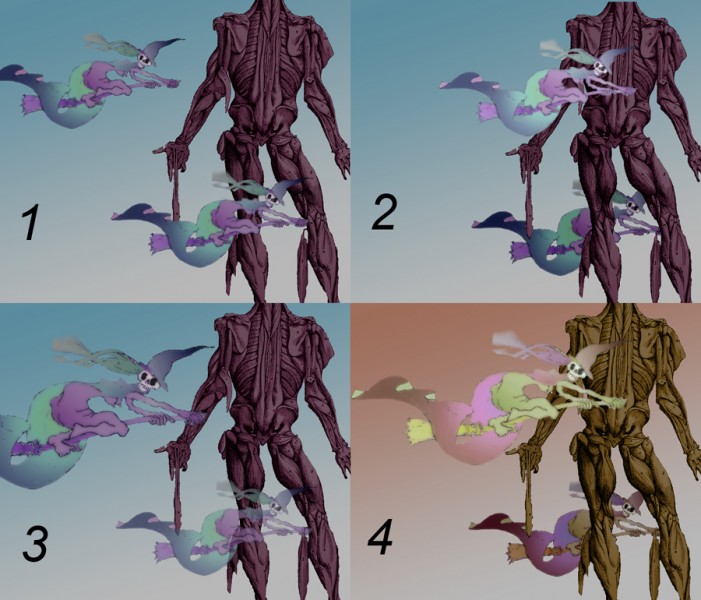
If you’ve just used Photoshop to adjust photos a bit, you may not have needed to use layers. For any more ambitious stuff, they’re essential, and at the heart of what makes it such a powerful package. As a demo I’ll use elements from my Halloween image – not maybe my finest hour, but useful for showing layers. This montage shows the basics of what you can do with them. (According to me! I’m not a real Photoshop wizard, and your comments and corrections would be very welcome).
Think of the montage as four separate images. Within each of the four images, there are five layers, one for each witch, one for the muscleman, one for the sky background, and one blank, truly background layer. You select the layer you want to work in, and changes you make in one layer don’t affect the others.
By working in one layer at a time, you can for example move elements of your picture round the screen (compare the top witch in 1 & 2); change which elements are in front of which (compare the lower witch in relation to the muscleman in 1 & 2); change the size of an element (compare the upper witch in 1 and 3); darken or lighten an element (compare the top witch in 1 and 2 again); make en element more or less transparent (note the lower witch in 3); or play with the overall colour and tonal scheme (I’ve changed all the layers that way in 4).
CS3 is huge, and there’s much, much more you can do, but one you’ve got these basics, just play around. I’ll be posting about how to do different types of tranformation later on – how to change colour, tone, making selections, changing proportions, using filters, etc. etc. Each one is a whole special field.
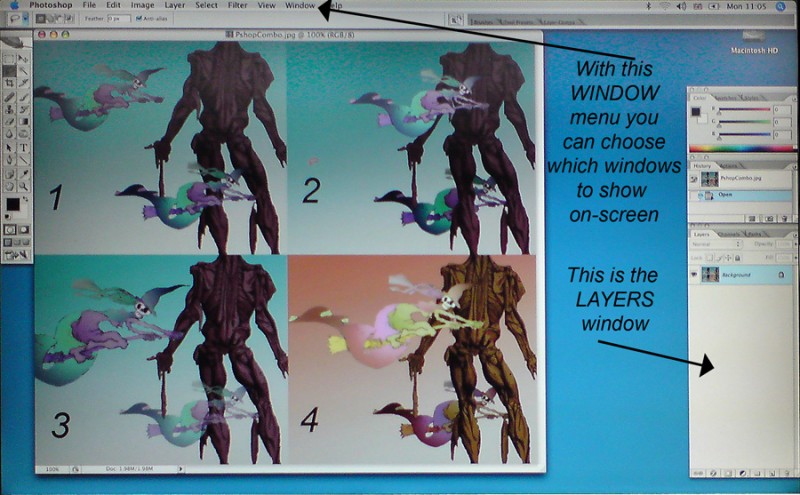
But first you need to know the basics of how to manage your layers. Here’s the whole screen (I use a Mac, but I think the PC screen is pretty similar):
There are two ways to manage layers. One is by making choices in the Layers menu in the bar at the top of the screen. The other is by using the on-screen Layers window. That window should be showing, as to the lower right. If it isn’t, click on windows in the menu bar, and then click on the option to show layers. There are some things you can do either via the menu bar Layer option, or in the on-screen window.
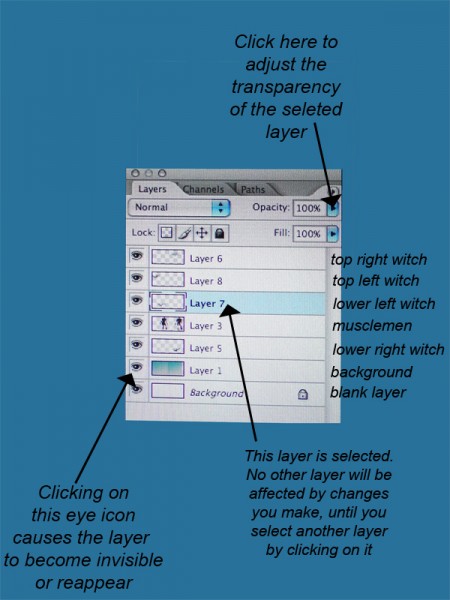
Take a closer look at the on-screen layers window. I’ve slightly confused matters because this is actually the window for the top pair of pictures, (the top pictures in the montage of four), combined. There’s one layer for each of the four witches in those two pictures, one layer for both musclemen, and one layer for the sky in both pictures.
In this window you can for example hide or reveal each layer by toggling the eye icons to the left, change layer transparency with the control top right, or change the order of layers in the stack (and so which elements appear in front of which) by dragging the layers up and down.
In the layer menu in the menu bar at the top of the screen, you’ll most frequently either call up a new layer, or else flatten the image by merging layers (see below for when you’d do that). You won’t have to create a new layer yourself if you copy a selection in an image, or from another image, and paste it: the selection is always pasted into a new layer. Similarly, text or geometric shapes are also automatically placed in new layers (see my first Photoshop post). But suppose you want to do some free-hand drawing on your picture, which may or not work out. You’d want to do that in its own layer, and for that click on layer in the menu bar at the top of the screen, and choose New.
Layers use up a lot of memory, and to save your finished image, especially for sending anywhere, you’ll want to flatten it (i.e. combine all the layers into one) to keep the filesize manageable. (You also have to flatten if you want to save your image as a jpeg). You can always keep a layered version as well, for future changes. To do that, save your layered version normally without quitting, and then, when you’re really ready to flatten, select Save As in the Edit menu in the menu bar at the top of the screen. Now save your image with a new file name, one you’ll recognise as identifying the flattened version. The on-screen file will then change to the new version, (you’ll see the new name appear at the top centre of the image), leaving the version you’ve been working on safely filed away for the future, just as you last saved it. Now you want to merge the layers in the new version of the image you are going to flatten. In the Layer menu, select flatten image. Then don’t forget to save again, before you quit.
One you’re used to working with layers, you will often be ready to partially flatten the image as you go along. You can for example always merge the selected layer with the one directly beneath it in the stack, by selecting Merge down in the Layers menu. (Or, on the Mac, just by pressing control-e).
A more advanced feature of layers to bear in mind is that parts of them can be opaque or transparent. For example, suppose you called up a new layer to draw on, it will probably appear by default as a white sheet, obscuring all the other layers. There are sophisticated ways to manage that, but for now, just remember that you can make the whole layer a bit transparent whilst you work on it, with the control at the top right of the on-screen layers window. That will let you position your drawing where you want it in the image (though of course you can always move it later). Then, once you’ve done your drawing, just select the blank bits you don’t want and delete them.
But that’s easily said – selection is a whole special theme for another post.


This web site is very cool