All posts by david

Escher’s “Waterfall” Explained

Here’s a demonstration of one of M.C.Escher’s famous pictures, the Waterfall. (Just put Escher Waterfall into Google Images to see his version).

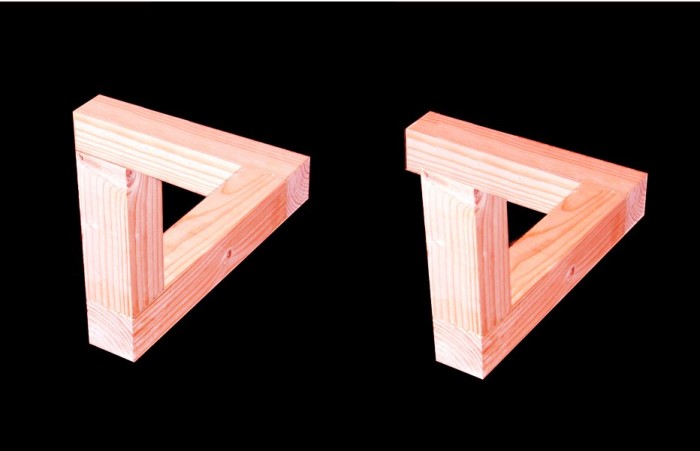
First of all, you need to understand how a famous “impossible figure” called the tribar produces its effect.

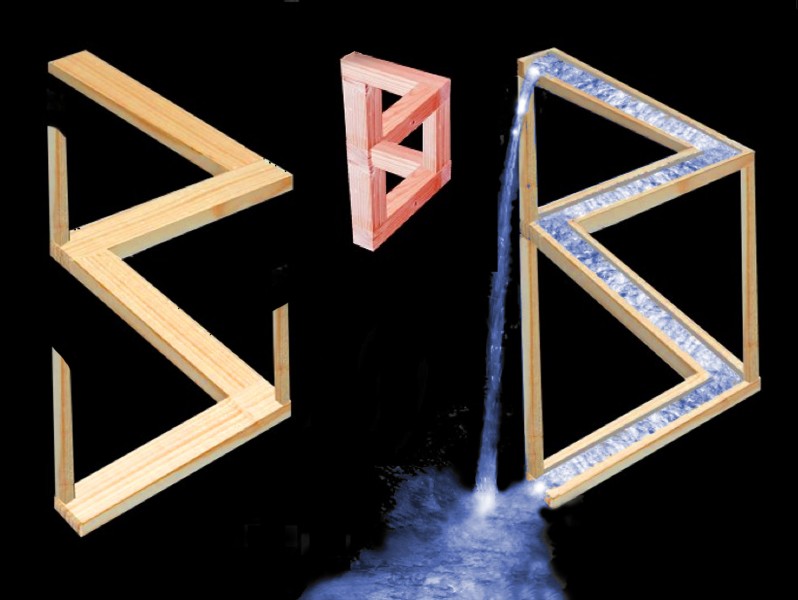
One the left, in the picture above, we see the tribar as an impossible figure. The top of the vertical bar to the left seems to be at both the nearest point in the image and the furthest point at the same time. In the image to the right, seen from a slightly different viewpoint, there’s no problem. The top of the vertical bar really is nearest to us. But seen as to the left, with the arm exactly aligned with the end of the arm to the rear, our brains go for the option that bars are connected as the most probable configuration – even though it’s impossible.

If you are good at fusing stereo picture pairs without a viewer, you’ll find these two images will show the tribar in 3-D.  For a guide to how to view 3D picture pairs without a viewer, in “cross-eyed” mode, try:

http://www.3dphoto.net/text/viewing/technique.html

There are other sites if you search on “viewing 3d picture pairs” or similar, and also animated guides on Youtube.

Now for Escher’s Waterfall. On the right below is my stripped down version. The water seems to be flowing uphill, and then pouring down to the bottom again. But then compare the right hand image with the small middle image: the configuration is just two tribars, one on top of the other. And on the left, with the vertical posts sawn off, so that our brains don’t have to connect them to the zig-zagging channels, the whole configuration seems to recede horizontally as it should, instead of stacking up impossibly.

Note added 16/5/17:  There’s a brilliant movie demo of this on Michael Bach’s illusion site.
Tessellations

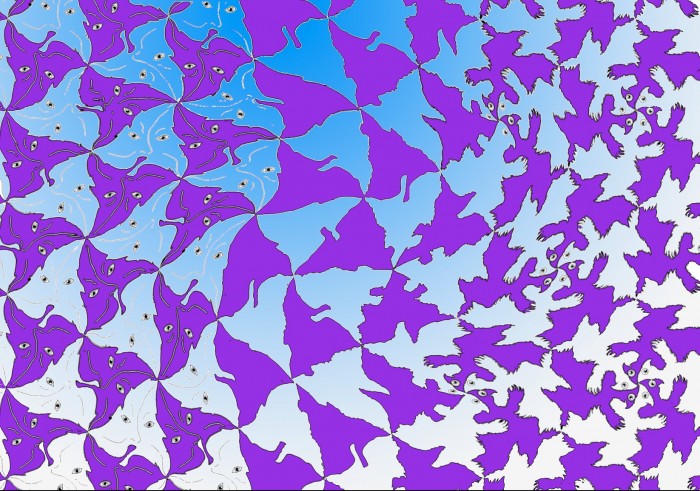
I love tessellations. Here’s quite a complicated example, with a transformation running across it, and an added graphic twist.

Want to try your own tessellations? There are software short-cuts you can use but to really get the hang of them, do them by hand, with a graphics package on a computer. (I use the graphics facility in a full version of Photoshop, but any capable graphics package should do the business. You will need to be fairly handy with it before you start doing tessellations, however). Or you can also really do them by hand, with tracing paper and pencil.

For an extended tutorial, see my tessellation tutorial, or visit another page with outstanding “how-to-do-it” demos.

Note added in March 2011!  If you are new to tessellations, first watch my later post with an animated demo of how tessellations work.

or for demos plus brilliant examples:

http://www.tessellations.org/mygallery16.htm (great examples)

For M.C. Escher’s tessellations see:
http://www.mcescher.com

Here’s my animated tessellation:

Tessellation Tutorial

Note added in March 2011!  If you’re new to tessellations, before tackling this post, first watch my later post with an animation of how tessellations work.

What is a tessellation?

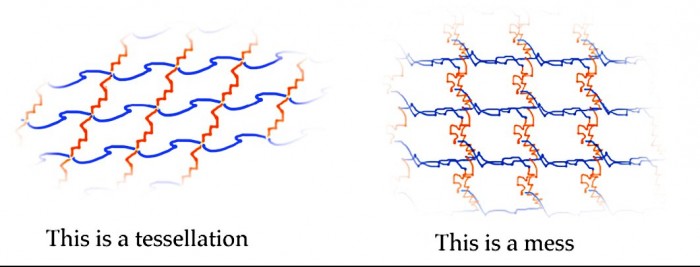
Any regular pattern consists of identical areas, which repeat without overlaps or gaps. An obvious example would be tiles on a wall. However tiles are usually geometric shapes – rectangles or squares as a rule, though triangles or hexagons would be possible too. In a tessellation, the cells can have wiggly edges, but still fit together like jig-saw pieces.

If you try to make a pattern like that out of any old shape, you will either end up with gaps or overlaps:

To make cells that tessellate, you have to follow a recipe. There are a whole set of recipes, but to get an idea of how they work, take a look at just one.

Continue reading